
MEAL #1
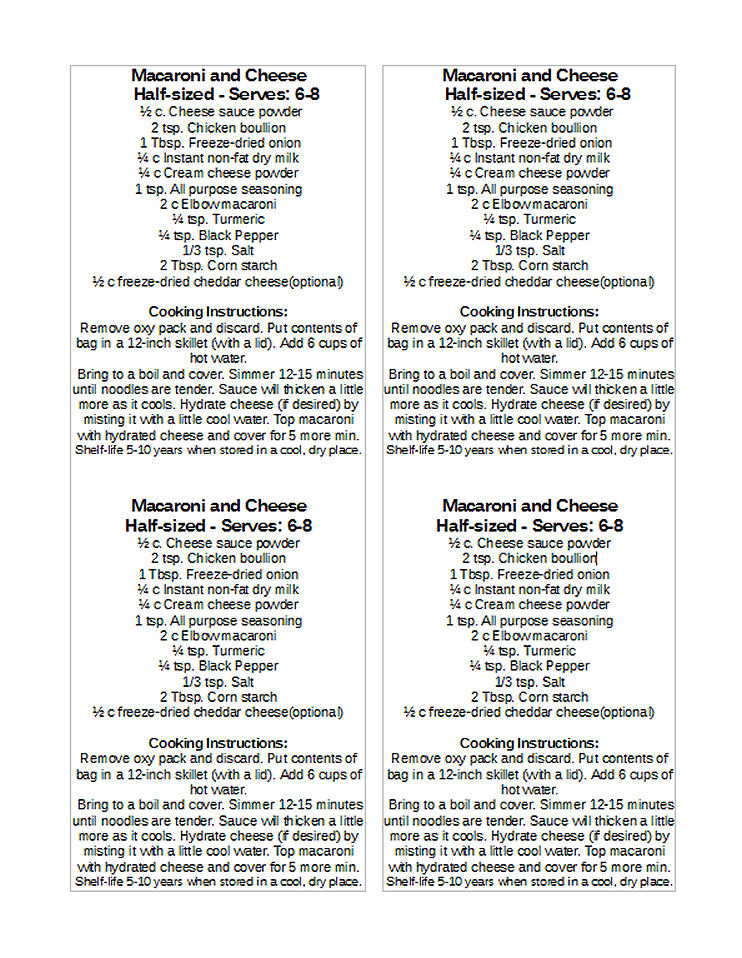
Macaroni and Cheese
Half-sized - Serves: 6-8
Ingredients:
½ c. Cheese sauce powder
2 tsp. Chicken bouillon
1 Tbsp. Freeze-dried onion
¼ c Instant non-fat dry milk
¼ c Cream cheese powder
1 tsp. All purpose seasoning
2 c Elbow macaroni
¼ tsp. Turmeric
¼ tsp. Black Pepper
1/3 tsp. Salt
2 Tbsp. Corn starch
½ c freeze-dried cheddar cheese(optional)
Cooking Instructions:
Remove oxy pack and discard. Put contents of bag in a 12-inch skillet (with a lid). Add 6 cups of hot water.
Bring to a boil and cover. Simmer 12-15 minutes until noodles are tender. Sauce will thicken a little more as it cools. Hydrate cheese (if desired) by misting it with a little cool water. Top macaroni with hydrated cheese and cover for 5 more min.
Shelf life is 5-10 years if stored in a cool, dry place. |
What you'll need to purchase to make
20 – Half Gallon bags
1 - #10 can Cheese sauce powder $22.59
1 - #10 can Powdered cream cheese $28.59
1 - #10 can dry onions $9.00
1- #10 can freeze-dried cheddar cheese (optional)
1 - pouch Instant non-fat dry milk $3.00
2 - 5lb bags Elbow macaroni $8.96
Other ingredients that you probably already have in your pantry:
-Chicken buillon powder
- All-purpose seasoning (recipe below)
- Tumeric
- Salt
- Pepper
- Corn Starch
What you'll have left over from purchased
ingredients after 20 meals:
Cream Cheese powder and dry onions. To be used in in the “Sausage Gravy and Biscuit Dumplings” dish. |
The total for each half-size meal will be approx $5-$6, depending on what is on sale, what you have shipped and where you drive for your ingredients. Save money by rotating through your current food storage! It'll remain in your storage, but as full meals instead of just ingredients!
Shipping for Honeyville is $5 for any size order. Shipping for Providentliving.com is $3 for any size order. Walmart.com is usually free. This meal is less than $1 per serving, with a shelf life of 5--10 years.
Information about items you wouldn't normally find in your own pantry
- Oxy packs: Home Storage. Pack of 100 is $10. Or they are at providentliving.com for $13 if you want them shipped with your mylar bags. Or you are welcome to purchase them from me if you don't need 100.
- Labels: On Amazon.com, Avery Shipping Labels 5065 box of 100, $23.95. You can fit 4-6 labels per page. Staples has them for $29.99 (they sometimes have coupons though). You are welcome to buy label pages from me for $0.24 each if you just need a few.
- Mylar bags: Case of 250 GALLON bags for $94 (plus $3 shipping) at www.providentliving.com. I take them to Staples who will cut them, a stack of 35 bags at a time, for $2 per cut. I usually get 140 bags cut length-wise for $8, which makes 280 narrow half-gallon bags. I am happy to sell you GALLON-sized bags for $0.39 each. You'll need to get them cut for half-gallon size.
- Elbow macaroni:You can get a 5 lb. bag through Walmart.com. It's $0.45 per 2 cup serving http://www.walmart.com/ip/Great-Value-Elbows-Pasta-5-lbs/47398713
- All purpose seasoning: I make my own recipe, see recipe below.
- Powdered cream cheese : $28.59 at Honeyville for approx 50, ¼ c servings
- Instant non-fat dry milk: Home Storage, $3 for approx 20, ¼ c servings (1 pouch)
- Cheese sauce powder: You can get one #10 can at Honeyville for $22.59. There are approx. 20, ½ c servings in each can. http://shop.honeyville.com/powdered-cheese.html
- Freeze-Dried cheddar cheese $45.99 for 22, ½ c servings, (from Honeyville). This is optional. Find on sale if possible!
- Did you know that Honeyville offers a 10% savings on all #10 cans if you buy 6 or more? The products can be mixed and matched. Saving $4.60 per can of cheese or $5.00 per can of Turkey, etc. is a big deal! They also have a loyalty program and will give you a $10 credit for every $200 you spend! Buy all of your ingredients at the same time for all 4 meals every other month and save! Or team up with other friends and family members to get your items and share the discount!
What you'll need to get started:
- Canning funnel (wide mouth – get the green one from Walmart, NOT the red one)
- Mylar bags (needs to be 7mil in thickness. You can buy gallon bags from me for $0.39 each)
- 300 cc Oxy packs (at Home Storage behind Deseret Industries. You can buy 100 for $10)
- Sealer (clothing iron, straightening iron or impulse sealer; mine is from Amazon.com)
- Avery Shipping Labels 5065 (a box of 100 is $23.95 on Amazon, $29.99 at Staples)
- Measuring cups/spoons
- Mircrofiber rags
- Fold-over sandwich bags IF you are planning to include the optional cheddar cheese to your meal.
To begin:
- Make sure the area where you'll be working is sanitary
- Wash your hands and/or wear gloves
- Pull your hair back or wear a hair net
Prep your mylar bags:
- Create labels (copy/paste recipe from www.52weekstobeprepared.blogspot.com – 4 or 6 to a page)
- Cut labels
- Affix labels at the BOTTOM of each bag
- Add the date to each label
- If you're working with a half-gallon bag, seal the long edge
Fill Bags Assembly-Line Style:
- Lay out your ingredients on a long work surface in desired order. I put my heaviest ingredients first, to weigh down the bag. Take out the oxy pack from each #10 can that you open and throw away.
- Lay out one measuring implement per ingredient. This will help with convenience and avoid confusion.
- Insert your canning funnel (for the half gallon size) into the top of the bag, then simply walk down your row of ingredients measuring 1 level of scoop of each ingredient to your mylar bag.
- Once finished, tap your bag on your surface, to insure all powders settle and displace the oxygen.
- Repeat with next bag.
Clean and Seal:
- Once you've finished 10-15 bags, use a microfiber rag to clean out the powder residue from the inside, where you'll be sealing it. The bag will not seal properly unless cleaned. I've found that using a very fine spray mist of water on the rag helps – but the inside of the bag must be completely dry before sealing, because oxy packs and moisture is a horrible combination and can cause botulism poisoning.
- After the whole batch of bags are cleaned on the inside...NOW is the time to open your bag of oxy packs and insert ONE into each half gallon bag or TWO into each gallon bag. Seal the rest of your oxy packs immediately. They can only be exposed to oxygen for about 10 minutes before they'll start getting completely used up. If you find they are becoming hot – work quickly! I always double seal my bags to insure their seal.
- Remember that Mylar Bags are not impervious to rodants. Store in a plastic bin or bucket with a tight lid.
All-purpose Seasoning: 3 Tbsp onion 3 Tbsp Parsley 2 tsp Oregano 3 tsp Garlic powder 2 tsp Celery seed 2 tsp Marjoram 2 tsp. Dried basil ½ tsp Dill seed ½ tsp Thyme ½ tsp Coriander ½ tsp Dry mustard ½ tsp Rosemary |
Assembly instructions at a glance:
Layer ingredients in a half-gallon mylar bag, shaking down the powdered ingredients into the bulkier items. In a small plasic bag, add the freeze-dried cheddar cheese. Squeeze air out and twist loosley closed. Place plastic bag on top of other ingredients. Using a small microfiber rag, clean the powder out of the inside of the bag where you'll be sealing it. Add one 300 cc oxy pack, push air out of the top of the bag, and seal closed with clothes iron, straightening iron, or mylar sealer. Date the label.
|
Click on labels below. Save in a Word Doc and then print on your label paper.
MEAL #2
Sausage
Gravy and Biscuit Dumplings - Serves: 4
Jar
Ingredients:
¾
c. Freeze-dried sausage
½
c Instant non-fat dry milk
½
c Cream cheese powder
1
Tbsp. Dried onion
1
tsp. All purpose seasoning
1/8
tsp. Black Pepper
¼
c All-purpose flour
Bag
Ingredients
1
c. All-purpose flour
1
tsp baking soda
2
Tbsp. Buttermilk powder
¼
tsp salt
Cooking
Instructions:
Remove
oxy pack and discard. In a 12” deep skillet with a lid, combine
the jar ingredients with 3 cups of hot water, and bring to a
simmer. Cook on med. heat for 10-12 mins., stirring occasionally.
In a medium bowl, combine the bag ingredients with 1/3 cup of cold
water. Stir just until combined. Drop this biscuit batter into the
gravy in the skillet in 8 small, equal mounds of dough. Cover
skillet and reduce heat to a low simmer. Cook for 10-12 min. until
biscuits are cooked through.
|
What
you'll need to purchase to make 15 – HALF GALLON bags
2
- pouches Instant non-fat dry milk ($6.00)
1
- #10 can of Honeyville Freeze-dried sausage crumbles ($40.79)
Ingredients
left over from the Macaroni and Cheese meal:
-You
should have about 15, ½ c servings of Cream Cheese powder
-All-purpose
seasoning (homemade)
-Dried
Onions
Other
ingredients that you probably already
have
in your pantry:
-All-purpose
flour
-
Buttermilk powder
-
Salt
-
Pepper
-
Baking Soda
What
you'll have left over from purchased
ingredients
after 15 meals: half a pouch of powdered milk. To be used in MANY
future meals. Or make it to drink! This new “spray process”
done by the church makes this powdered milk delicious to drink!
|
The
total for each half-size meal will be approx $5.50-$6.50,
depending on what is on sale, what you have shipped and where you
drive for your ingredients. Save money by rotating through your
current food storage! Your items will remain in your storage, but as
full meals instead of just ingredients!
Shipping
for Honeyville is $5 for any size order. Shipping for
Providentliving.com is $3 for any size order. Walmart.com is usually
free. This meal is about $1.50 per
serving, with a shelf life of 5--10 years.
Information
about items you wouldn't normally find in your own pantry
- Oxy packs: Home Storage. Pack of 100 is $10. Or they are at providentliving.com for $13 if you want them shipped with your mylar bags. Or you are welcome to purchse them from me if you don't need 100.
- Labels: On Amazon.com, Avery Shipping Labels 5065 box of 100, $23.95. You can fit 4-6 labels per page. Staples has them for $29.99 (they sometimes have coupons though). You are welcome to buy label pages from me for $0.24 each if you just need a few.
- Mylar bags: Case of 250 GALLON bags for $94 (plus $3 shipping) at www.providentliving.com. I take them to Staples who will cut them, a stack of 35 bags at a time, for $2 per cut. I usually get 140 bags cut length-wise for $8, which makes 280 narrow half-gallon bags. I am happy to sell you GALLON-sized bags for $0.39 each. You'll need to get them cut for half-gallon size.
- All purpose seasoning: I make my own recipe, see other side.
- Powdered cream cheese : $28.59 at Honeyville for approx 50, ¼ c servings.
- Instant non-fat dry milk: Home Storage, $3 for approx 10, ½ c servings (1 pouch)
- Did you know that Honeyville offers a 10% savings on all #10 cans if you buy 6 or more? The products can be mixed and matched. Saving $4.08 per can of susage or $2.86 per can of Cream Cheese powder, etc. is a big deal! They also have a loyalty program and will give you a $10 credit for every $200 you spend! Buy all of your ingredients at the same time for all 4 meals every other month and save! Or team up with other friends and family members to get your items and share the discount! --->
What
you'll need to get started:
- Canning funnel (wide mouth – get the green one from Walmart, NOT the red one)
- Mylar bags (needs to be 7mil in thickness. You can buy gallon bags from me for $0.39 each)
- 300 cc Oxy packs (at Home Storage behind Deseret Industries. You can buy 100 for $10)
- Sealer (clothing iron, straightening iron or impulse sealer; mine is from Amazon.com)
- Avery Shipping Labels 5065 (a box of 100 is $23.95 on Amazon, $29.99 at Staples)
- Measuring cups/spoons
- Mircrofiber rags
- Fold-over sandwhich bags for the “Bag Ingredients” portion of this meal
To
begin:
- Make sure the area where you'll be working is sanitary
- Wash your hands and/or wear gloves
- Pull your hair back or wear a hair net
Prep
your mylar bags:
- Create labels (copy/paste recipe from www.52weekstobeprepared.blogspot.com – 4 or 6 to a page)
- Cut labels
- Affix labels at the BOTTOM of each bag
- Add the date to each label
- If you're working with a half-gallon bag, seal the long edge
Fill
Bags Assembly-Line Style:
- Lay out your ingredients on a long work surface in desired order. I put my heaviest ingredients first, to weigh down the bag. Take out the oxy pack from each #10 can that you open and throw away.
- Lay out one measuring implement per ingredient. This will help with convenience and avoid confusion.
- Insert your canning funnel (for the half gallon size) into the top of the bag, then simply walk down your row of ingredients measuring 1 level of scoop of each ingredient to your mylar bag.
-
Once finished, tap your bag on your surface, to insure all
powders settle and displace the oxygen.
- Repeat with next bag.
Clean
and Seal:
- Once you've finished 10-15 bags, use a microfiber rag to clean out the powder residue from the inside, where you'll be sealing it. The bag will not seal properly unless cleaned. I've found that using a very fine spray mist of water on the rag helps – but the inside of the bag must be completely dry before sealing, because oxy packs and moisture is a horrible combination and can cause botulism poisoning.
- After the whole batch of bags are cleaned on the inside...NOW is the time to open your bag of oxy packs and insert ONE into each half gallon bag or TWO into each gallon bag. Seal the rest of your oxy packs immediately. They can only be exposed to oxygen for about 10 minutes before they'll start getting completely used up. If you find they are becoming hot – work quickly! I always double seal my bags to insure their seal.
- Remember that Mylar Bags are not impervious to rodents. Store in a plastic bin or bucket with a tight lid.
All-purpose
Seasoning:
3
Tbsp onion
3
Tbsp Parsley
2
tsp Oregano
3
tsp Garlic powder
2
tsp Celery seed
2
tsp Marjoram
2
tsp. Dried basil
½
tsp Dill seed
½
tsp Thyme
½
tsp Coriander
½
tsp Dry mustard
½
tsp Rosemary
|
Assembly
instructions at a glance:
Layer
ingredients in a half-gallon mylar bag, shaking down the powdered
ingredients into the bulkier items. In
a small plastic bag, add the Bag Ingredients.
Squeeze air out and twist loosely closed. Place plastic bag on top
of other ingredients. Using a small microfiber rag, clean the
powder out of the inside of the bag where you'll be sealing it.
Add one 300 cc oxy pack, push air out of the top of the bag,and
seal closed with clothes iron, straightening iron, or mylar
sealer.
Date the label. |
Click on labels below. Save in a Word Doc and then print on your label paper.

MEAL #3
MEAL #3
Berries and Bavarian Lemon Cream Cereal - Serves: 4
Jar Ingredients:
Scant 1 c. 6 grain rolled cereal
2/3 c freeze-dried mixed berries (crush slightly)
¼ c wild berry smoothie mix (Honeyville)
1/3 c sugar
2 Tbsp. Lemonade powder
Cooking Instructions:
Remove oxy pack and discard.In a saucepan, boil 2 2/3 c. of warer and add contents of the bag. Simmer for 3-4 minutes. Use more or less water depending on how thick or thin you like your cereal.
Shelf life 5-10 year when stored in a cool, dry place.
|
What you'll need to purchase to make 15 – HALF GALLON bags
1 - #10 can 6 grain rolled cereal (Honeyville, $9.49)
1 - #10 can freeze-dried mixed berries (Emergency Essentials - $28.95)
2 small cans - Wild Berry Smoothie Mix (Honeyville - $5.99)
Other ingredients that you probably already
have in your pantry:
Sugar
Lemonade powder
What you'll have left over:
Nothing
|
The total for each half-size meal will be approx $3.50-4.00, depending on what is on sale, what you have shipped and where you drive for your ingredients. Save money by rotaing through your current food storage! Your items will remain in your storage, but as full meals instead of just ingredients!
Shipping
for Honeyville is $5 for any size order. Shipping for
Providentliving.com is $3 for any size order.
Walmart.com
is usually free. This meal is less than $1.00 per
serving, with a shelf life of 5--10 years.
What
you'll need to get started:
- Canning funnel (wide mouth – get the green one from Walmart, NOT the red one)
- Mylar bags (needs to be 7mil in thickness. You can buy gallon bags from me for $0.39 each)
- 300 cc Oxy packs (at Home Storage behind Deseret Industries. You can buy 100 for $10)
- Sealer (clothing iron, straightening iron or impulse sealer; mine is from Amazon.com)
- Avery Shipping Labels 5065 (a box of 100 is $23.95 on Amazon, $29.99 at Staples)
- Measuring cups/spoons
- Mircrofiber rags
To
begin:
- Make sure the area where you'll be working is sanitary
- Wash your hands and/or wear gloves
- Pull your hair back or wear a hair net
Prep
your mylar bags:
- Create labels (copy/paste recipe from www.52weekstobeprepared.blogspot.com – 4 or 6 to a page)
- Cut labels
- Affix labels at the BOTTOM of each bag
- Add the date to each label
- If you're working with a half-gallon bag, seal the long edge
Fill
Bags Assmebly-Line Style:
- Lay out your ingredients on a long work surface in desired order. I put my heaviest ingredients first, to weigh down the bag. Take out the oxy pack from each #10 can that you open and throw away.
- Lay out one measuring implement per ingredient. This will help with convenience and avoid confusion.
- Insert your canning funnel (for the half gallon size) into the top of the bag, then simply walk down your row of ingredients measuring 1 level of scoop of each ingredient to your mylar bag.
-
Once finished, tap your bag on your surface, to insure all
powders settle and displace the oxygen.
- Repeat with next bag.
Clean
and Seal:
- Once you've finished 10-15 bags, use a microfiber rag to clean out the powder residue from the inside, where you'll be sealing it. The bag will not seal properly unless cleaned. I've found that using a very fine spray mist of water on the rag helps – but the inside of the bag must be completely dry before sealing, because oxy packs and moisture is a horrible combination and can cause botulism poisoning.
- After the whole batch of bags are cleaned on the inside...NOW is the time to open your bag of oxy packs and insert ONE into each half gallon bag orTWO into each gallon bag. Seal the rest of your oxy packs immediately. They can only be exposed to oxygen for about 10 minutes before they'll start getting completely used up. If you find they are becoming hot – work quickly! I always double seal my bags to insure their seal. Remember that Mylar Bags are not impervious to rodants. Store in a plastic bin or bucket with a tight lid.
Click on labels below. Save in a Word Doc and then print on your label paper.

MEAL #4
Vanilla and Orange Roll Cereal - Serves: 4
Jar Ingredients:
1 ¼ c. 6 grain rolled cereal
½ c vanilla pudding powder
¼ c granulated honey
2 tsp dried orange zest
Cooking Instructions:
Remove oxy pack and discard. Combine contents of the bag with 2 ½ c boiling water in a saucepan. Simmer for 3-4 minutes. Use more or less water depending on how thick or thin you like your cereal.
Shelf life 5-10 year when stored in a cool, dry place.
|
What you'll need to purchase to make 10 - HALF GALLON bags
1 - #10 can 6 grain rolled cereal (Honeyville, $9.49)
1 - #10 can Vanilla Pudding Powder (Honeyville - $13.19)
1 - 2lb. bag of granulated honey (Honeyville, $11.99)
Other ingredients that you probably already have in your pantry:
Spice – dried orange zest (or purchase at local market)
What you'll have left over:
A couple servings of pudding and honey powder.
|
The
total for each half-size meal will be approx $3.50-4.00,
depending on what is on sale, what you have shipped and where you
drive for your ingredients. Save
money by rotaing through your current food storage! Your items will
remain in your storage, but as full meals instead of just
ingredients!
Shipping
for Honeyville is $5 for any size order. Shipping for
Providentliving.com is $3 for any size order.
Walmart.com
is usually free. This meal is less than $1.00 per
serving, with a shelf life of 5--10 years.
What
you'll need to get started:
- Canning funnel (wide mouth – get the green one from Walmart, NOT the red one)
- Mylar bags (needs to be 7mil in thickness. You can buy gallon bags from me for $0.39 each)
- 300 cc Oxy packs (at Home Storage behind Deseret Industries. You can buy 100 for $10)
- Sealer (clothing iron, straightening iron or impulse sealer; mine is from Amazon.com)
- Avery Shipping Labels 5065 (a box of 100 is $23.95 on Amazon, $29.99 at Staples)
- Measuring cups/spoons
- Mircrofiber rags
To
begin:
- Make sure the area where you'll be working is sanitary
- Wash your hands and/or wear gloves
- Pull your hair back or wear a hair net
Prep
your mylar bags:
- Create labels (copy/paste recipe from www.52weekstobeprepared.blogspot.com – 4 or 6 to a page)
- Cut labels
- Affix labels at the BOTTOM of each bag
- Add the date to each label
- If you're working with a half-gallon bag, seal the long edge
Fill
Bags Assmebly-Line Style:
- Lay out your ingredients on a long work surface in desired order. I put my heaviest ingredients first, to weigh down the bag. Take out the oxy pack from each #10 can that you open and throw away.
- Lay out one measuring implement per ingredient. This will help with convenience and avoid confusion.
- Insert your canning funnel (for the half gallon size) into the top of the bag, then simply walk down your row of ingredients measuring 1 level of scoop of each ingredient to your mylar bag.
-
Once finished, tap your bag on your surface, to insure all
powders settle and displace the oxygen.
- Repeat with next bag.
Clean
and Seal:
- Once you've finished 10-15 bags, use a microfiber rag to clean out the powder residue from the inside, where you'll be sealing it. The bag will not seal properly unless cleaned. I've found that using a very fine spray mist of water on the rag helps – but the inside of the bag must be completely dry before sealing, because oxy packs and moisture is a horrible combination and can cause botulism poisoning.
- After the whole batch of bags are cleaned on the inside...NOW is the time to open your bag of oxy packs and insert ONE into each half gallon bag orTWO into each gallon bag. Seal the rest of your oxy packs immediately. They can only be exposed to oxygen for about 10 minutes before they'll start getting completely used up. If you find they are becoming hot – work quickly! I always double seal my bags to insure their seal. Remember that Mylar Bags are not impervious to rodants. Store in a plastic bin or bucket with a tight lid.
Click on labels below. Save in a Word Doc and then print on your label paper.

No comments:
Post a Comment